Importing a Sigmafine Model
You can import a Model that has been built with the System Explorer. This creates a visual rendition that is based on the Sigmafine Database. This is usually not recommended because the elements do not appear in an orderly manner in the display; however, you may wish to use this approach if your Model is relatively small.
Note: Before you start, refer to the section described earlier and perform the 3 recommended settings steps.
To import a model:
Open the PI System window.
From the menu, select File > Import Model.
The Import Model window opens.
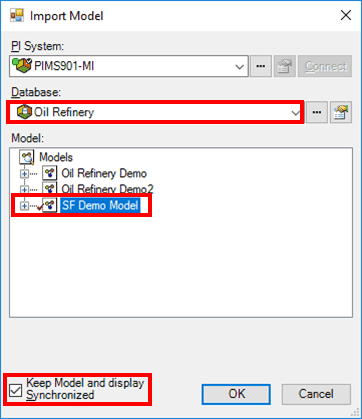
The 'PI System' box is automatically populated with your default server. However, you can add another server by following step 3.
To add another server, click the PI System down-arrow and select the server on which the Model is stored.
If the server you need is not listed, click the
 ellipsis button to open a server selection window where you can locate and select the server.
Click the Database down-arrow and select the database in which the Model is stored.
If the database you need is not listed, click the
ellipsis button to open a database selection window where you can locate and select the database.In the Model area, highlight the Model that you want to import.
To ensure that the display remains synchronized with the model , check the Keep Model and Display Synchronized checkbox.
Click OK to close the Import Model window.
The Modeler imports the Model and renders it in a ProcessBook display.
For more information about synchronizing the Model with the database, see next section "Synchronizing the Model and the Display."
After importing, you can use build mode to reposition ProcessBook objects that are created and reroute connections as needed.
Saving and Checking In Changes
Changes that you make to a display or Model need to be saved in the database and/or the Model or display file (.pdi, or .piw). As you work, you can do a save operation at these areas:
Save Changes to the Database and Model or Display
To save all changes in the database, as well as the Model or display file:
From the PI System menu, select File > Save.
This action saves all changes in the database, and the Model or display file. Typically, this is the most commonly used method to save your work.
Save Changes to the Database Only
To save all changes to the database only:
- From the PI System menu, select File > AF Check-in.
Note: For either of these two save operations, if two or more Models are open when you save, database changes pending for all Models are saved.
Saving and Checking In Changes
Changes that you make to a display or Model need to be saved in the database and/or the Model or display file (.pdi, or .piw). As you work, you can do a save operation at these areas:
Saving Changes to the Database and Model or Display
To save all changes in the database, as well as the Model or display file:
From the PI System menu, select File > Save.
This action saves all changes in the database, and the Model or display file. Typically, this is the most commonly used method to save your work.
Saving Changes to the Database Only
To save all changes to the database only:
- From the PI System menu, select File > AF Check-in.
Note: For either of these two save operations, if two or more Models are open when you save, database changes pending for all Models are saved.
Saving Changes in the AF Browser Window
To save changes in the AF Browser window:
Right-click on the object you want to save, and select Check In from the pop-up menu (as shown in Figure 152).

This action saves changes in the database for only the selected object.